How to Create a Delegated Custom Connector in Power Platform to Call Microsoft Graph API
If you need to call Graph API endpoints like /me, /me/messages, or /me/events, you must use delegated authentication.
The best way to achieve this in Power Platform is by creating a Custom Connector with OAuth2 delegated flow.
Step 1: Register an App in Azure AD
-
Go to Azure Portal → Azure Active Directory → App registrations → New registration.
-
Give your app a name (eg: Graph API Power Automate).
-
Save the app and note down:
-
Application (client) ID
-
Directory (tenant) ID
-
Step 2: Configure API Permissions
-
In your registered app → API permissions → Add a permission.
-
Select Microsoft Graph → Delegated permissions.
-
Add the ones you need:
-
User.Read(profile info) -
Mail.Read(emails) -
Calendars.Read(calendar events)
-
-
Click Grant admin consent.
Step 3: Create the Custom Connector
-
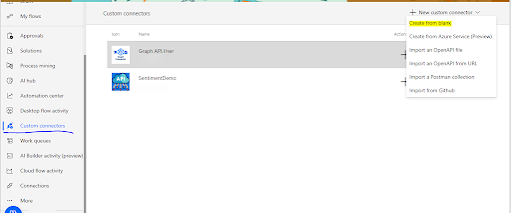
In Power Automate (or Power Apps) → go to Data → Custom connectors → New custom connector → Create from blank.
-
Name it
Graph API.
Step 4: Configure Security
In the Security tab:
-
Authentication type: OAuth 2.0
-
Identity Provider: Azure Active Directory
-
Client ID: (from Azure AD app)
-
Client Secret: (create one under Certificates & Secrets)
-
Tenant ID:
common Authorization URL: https://login.microsoftonline.com-
Resource URL:
https://graph.microsoft.com -
Enable on-behalf-of login:
false -
Scope: List the Graph API delegated permissions you need, space-separated.
-
Redirect URL: (leave blank now; after saving, Power Platform generates one → copy it back into your Azure AD app → Redirect URIs). Before creating connection to the custom connector copy this URL go to Azure App created in go to authentication tab add redirect Uri then select web option and paste the URL and click configure
Step 5: Define an Action
-
In the Definition tab → Add a new action.
-
Summary:
Get Logged In User Details -
Operation ID:
GetLoggedInUserDetails -
Import from sample:
-
Verb:
GET -
URL:
https://graph.microsoft.com/v1.0/me Response: You can get from documentation
-
Step 6: Test the Connector
-
Save the connector.
-
In the Test tab, click New connection and sign in with your Microsoft 365 account.
-
Run the Get Logged In User Details action → you should see your user profile JSON returned.
✅ Using the Connector in Power Apps or Power Automate
-
In Power Automate → add the custom connector action into your flow.
-
In Power Apps → go to Data → Add data → + Add connection → Custom connectors → select your connector.
-
You can now call
/meand other delegated Graph APIs seamlessly.


Comments
Post a Comment