Posts

Showing posts with the label Azure App Service

Steps to Embed a HTML Page in a Model-Driven App Form

Image
 Step 1: Upload the HTML file as a Web Resource Open your solution, then click on + New and select Web Resource. Add your HTML code. Set the File Type to 'Webpage (HTML)', provide a Name and Display Name, then click Save. HTML CODE: <!DOCTYPE html> <html> <head>     <title>Account Info</title>     <meta charset="utf-8" />     <script src="ClientGlobalContext.js.aspx" type="text/javascript"></script>     <style>         body {             font-family: "Segoe UI", sans-serif;             padding: 20px;         }     </style> </head> <body>     <h2>Account Information</h2>     <p> <strong>Record Id:</strong> <span id="id">Loading...</span><br/> <strong>Entity Name:</strong> <span...

Step-by-Step Guide: Power Automate Custom Connector Using Graph API from Azure App Service

Image
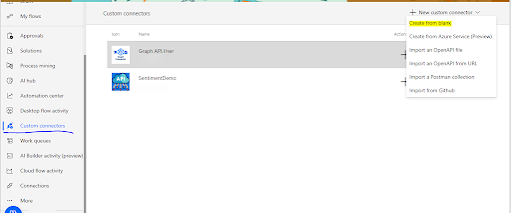
Step 1: Open Power Automate, navigate to the Custom Connectors tab, and select Create from blank as shown in the image below. custom connector(click image for better resolution) Step 2: In the General tab, upload an icon (less than 1MB), add a description, select the correct scheme (in my case, HTTPS ), and provide the host name. For example, if your API URL is https://graph.microsoft.com/v1.0/users/{email} , the host name will be the highlighted part — graph.microsoft.com . Step 3: Go to the Security tab. Here, you need to select the authentication method. Choose OAuth 2.0 as the authentication type, as shown in the image below. Step 4: Select the Identity Provider as Azure Active Directory . Check the box Enable Service Principal Support . This option allows you to create a connection using a Client ID and Client Secret instead of using the user's own authentication. Next, provide the Client ID , Client Secret , Tenant ID , and other required details as shown in t...

Calling Microsoft Graph API from Power Automate Using Azure App Services – Step-by-Step Guide

Image
Step 1: You should have an Azure subscription, or if you have access to the Microsoft Entra Admin Center, you can create an app from there. This app can then be used in Power Automate to connect to Microsoft Graph API. Step 2: Click on "New registration" , provide a name for your app, assign the required API permissions (such as Microsoft Graph permissions), and then click "Register" to complete the app registration process. Step 3: After registration, you'll be redirected to the app's overview page. From there, navigate to the API permissions tab and click "Add a permission" to assign the necessary Microsoft Graph API permissions. Step 4: Select Microsoft Graph as the API, and based on your requirements, choose the appropriate permissions. In my case, I selected Application permissions , which do not require user sign-in and are suitable for background services or automation. Step 5: Select the required Microsoft Graph API permissions. Yo...