Posts

Showing posts with the label Power Automate

Steps to Embed a HTML Page in a Model-Driven App Form

Image
 Step 1: Upload the HTML file as a Web Resource Open your solution, then click on + New and select Web Resource. Add your HTML code. Set the File Type to 'Webpage (HTML)', provide a Name and Display Name, then click Save. HTML CODE: <!DOCTYPE html> <html> <head>     <title>Account Info</title>     <meta charset="utf-8" />     <script src="ClientGlobalContext.js.aspx" type="text/javascript"></script>     <style>         body {             font-family: "Segoe UI", sans-serif;             padding: 20px;         }     </style> </head> <body>     <h2>Account Information</h2>     <p> <strong>Record Id:</strong> <span id="id">Loading...</span><br/> <strong>Entity Name:</strong> <span...

Unleashing Power Apps with Your Local MSSQL Data

Image
  Step 1: Install LocalDB Before proceeding, make sure LocalDB is installed on your computer. You can refer to the installation guide using this link . Step 2: Install SQL Server Management Studio (SSMS) Download and install SSMS by following this link . Step 3: Open SSMS Launch SQL Server Management Studio . You will see a window like the one shown below. Then, click on Connect . Step 4: Create a Database and Tables After connecting to the server, create a new database and the required tables as shown in the image below. To create a database: Right-click on Databases in the Object Explorer Select New Database Provide a name and click OK To create a table: Expand your newly created database Right-click on Tables Select New Table , then define your columns and data types Step 5: Install the On-Premises Data Gateway To connect your local database with cloud services like Power BI or Power Apps, you need to install the On-Premises Data Gateway . 👉 Click on this lin...

Step-by-Step: Give Unique Permissions to OneDrive Files Using Power Automate and Graph API (No Premium License Needed)

Image
We are uploading files through Power Apps using the Attachment control. In the backend, a Power Automate flow uploads these files to OneDrive and assigns unique permissions . Since Power Automate does not have a built-in connector to directly assign unique permissions in OneDrive, we are handling this through the Microsoft Graph API (without using a custom connector). Step 1: Create a Blank Power Apps Application Open Power Apps Studio. Select New app > Start with a page design as shown below. Step 2 :  select Blank Canvas  Step 3: Add an Attachment Control In Power Apps, the Attachment control is not available directly from the standard controls list. To get the Attachment control: Add an Edit Form to your app. Connect the form to a SharePoint list . Once connected, the form will automatically include the Attachments field. You can then use this Attachment control to upload files. Step 4: Keep Only the Attachment Control Since we only need th...

Step-by-Step Guide: Power Automate Custom Connector Using Graph API from Azure App Service

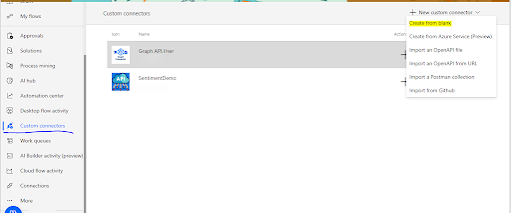
Image
Step 1: Open Power Automate, navigate to the Custom Connectors tab, and select Create from blank as shown in the image below. custom connector(click image for better resolution) Step 2: In the General tab, upload an icon (less than 1MB), add a description, select the correct scheme (in my case, HTTPS ), and provide the host name. For example, if your API URL is https://graph.microsoft.com/v1.0/users/{email} , the host name will be the highlighted part — graph.microsoft.com . Step 3: Go to the Security tab. Here, you need to select the authentication method. Choose OAuth 2.0 as the authentication type, as shown in the image below. Step 4: Select the Identity Provider as Azure Active Directory . Check the box Enable Service Principal Support . This option allows you to create a connection using a Client ID and Client Secret instead of using the user's own authentication. Next, provide the Client ID , Client Secret , Tenant ID , and other required details as shown in t...