Posts

Showing posts with the label Microsoft

Merge Data Tables vs Join Data Tables in Power Automate Desktop

DT Merge Data Tables vs Join Data Tables in Power Automate Desktop Quick reference for action selection, behavior, and constraints Merge Data Tables Purpose: append rows from one data table into another. Use when two tables share a common structure or when stacking rows is the goal. Inputs: primary table variable, secondary table variable, merge mode option. Merge mode handles schema differences: add extra columns, ignore extra columns, or error on extra columns. Behavior: rows from the second table are added to the first table variable. Limits: no relational matching, memory usage for large tables, result is in-memory only. Join Data Tables Purpose: perform relational-style joins using key-based rules. Use when rows must be matched between tables and fields from both tables are needed in the output. Inputs: first table, second table, join type (Inner, Left, F...

Power Automate Desktop: Data Table Explained

PA Power Automate Desktop - Data Table Concise reference - what it is, where to use, when to use, limitations 1. What it is A Data Table is an in-memory tabular structure with named columns and rows, implemented on the .NET DataTable model. Use it to hold structured records inside a flow for manipulation, iteration, and transformation before exporting or persisting. 2. Where you can use it Read Excel or CSV data and process rows without opening Excel UI Aggregate results from web scraping or API responses into a structured form Prepare datasets for export to SharePoint, databases, or files Combine multiple sources - append, merge, or join data before output Drive decision logic by iterating rows and applying conditional operations 3. When to use it When automation must process multiple records in memory during runtime When you need temporary structured storage between extraction and output step...

Supercharge Your Power Apps Look with SVG

Image
 What is SVG? SVG (Scalable Vector Graphics) is an XML-based vector image format for two-dimensional graphics. Unlike raster images (like PNG or JPG), SVGs don’t lose quality when scaled , making them perfect for responsive and sharp UI designs. Key Benefits of SVG: Scalable without losing quality. Lightweight compared to image files. Customizable using CSS or inline styles. Supports interactivity and animations. Ideal for icons, shapes, progress indicators, graphs, etc. How to Use SVG in Power Apps – Step by Step Step 1: Get Your SVG Code You can get SVG code from: https://www.svgrepo.com/ https://fonts.google.com/icons Or export from tools like Figma, Adobe Illustrator etc Or you can use Microsoft Copilot or ChatGPT to create the SVG's for example just give prompt as give SVG code for progress bar Step 2: Convert SVG to a Data URI (if needed) Power Apps doesn’t support raw <svg> tags directly. Convert it to data URI format...

Unleashing Power Apps with Your Local MSSQL Data

Image
  Step 1: Install LocalDB Before proceeding, make sure LocalDB is installed on your computer. You can refer to the installation guide using this link . Step 2: Install SQL Server Management Studio (SSMS) Download and install SSMS by following this link . Step 3: Open SSMS Launch SQL Server Management Studio . You will see a window like the one shown below. Then, click on Connect . Step 4: Create a Database and Tables After connecting to the server, create a new database and the required tables as shown in the image below. To create a database: Right-click on Databases in the Object Explorer Select New Database Provide a name and click OK To create a table: Expand your newly created database Right-click on Tables Select New Table , then define your columns and data types Step 5: Install the On-Premises Data Gateway To connect your local database with cloud services like Power BI or Power Apps, you need to install the On-Premises Data Gateway . 👉 Click on this lin...

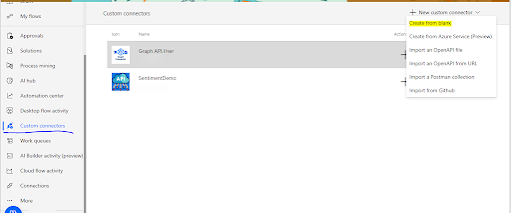
Step-by-Step Guide: Power Automate Custom Connector Using Graph API from Azure App Service

Image
Step 1: Open Power Automate, navigate to the Custom Connectors tab, and select Create from blank as shown in the image below. custom connector(click image for better resolution) Step 2: In the General tab, upload an icon (less than 1MB), add a description, select the correct scheme (in my case, HTTPS ), and provide the host name. For example, if your API URL is https://graph.microsoft.com/v1.0/users/{email} , the host name will be the highlighted part — graph.microsoft.com . Step 3: Go to the Security tab. Here, you need to select the authentication method. Choose OAuth 2.0 as the authentication type, as shown in the image below. Step 4: Select the Identity Provider as Azure Active Directory . Check the box Enable Service Principal Support . This option allows you to create a connection using a Client ID and Client Secret instead of using the user's own authentication. Next, provide the Client ID , Client Secret , Tenant ID , and other required details as shown in t...